Managing Terraform State
Introduction
In certain scenarios it may be necessary to perform one-off actions on your terraform state files, for instance…
- force-unlocking the state
- importing manually created resources to the state
- removing resources you no longer wish to manage in state
For these scenarios we have supplied a Terraform State Management GitHub Action for managing your state files.
Using the GitHub Action
- Navigate to the Terraform State Management GitHub Action
- Select
Run workflow - You will be presented with a series of options for the various operations available
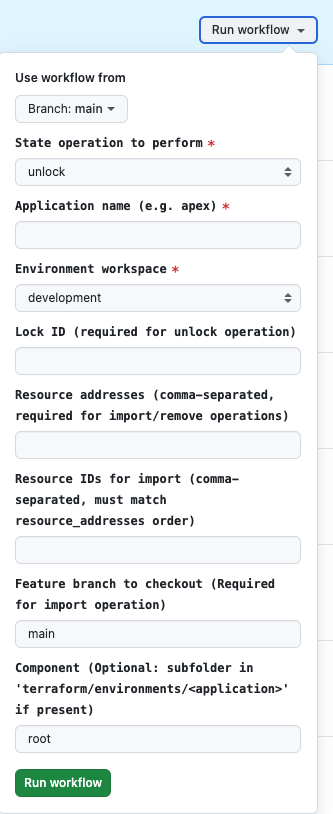
Note: If you are managing the state for a component directory (i.e. a subfolder in
terraform/environments/<application>) then you will need to supply the name of the relevant directory in theComponentfield.For most users this can be left as the default
rootvalue
How to force unlock TF state
- Select the
unlockoperation - Enter your application name e.g.
apex - Select the relevant environment workspace e.g.
development - Enter the state lock id e.g.
f2aa1369-2236-3b89-5a03-db4de84b1234 - Select
Run Workflow - The workflow will commence and show a summary of the information supplied, after which a manual review is required.
- If you are content to proceed select
review deployments, select the relevant tick box for the environment and finally selectApprove and deploy - The deployment will continue and unlock the state. If any errors are encountered you can review the logs for further info.
How to import resources into the TF state
Note: Before using this operation you need to add the resources you are intending to import to your terraform config on a feature branch
- Select the
importoperation - Enter your application name e.g.
apex - Select the relevant environment workspace e.g.
development - Enter
resource addressesas required (these must be comma separated when handling multiple resources)
- e.g. to import an s3 bucket/ec2 instance
aws_s3_bucket.test_import_bucket,aws_instance.test_import_instance
- Enter the
resource IDsas required (again comma separated and must match theresource addressesorder)
- e.g.
test-s3-bucket-name,i-0c9c2b36e598cefea
- Enter the name of the
feature branchwith your associated config for the imported resources - Select
Run Workflow, and follow the same steps as above to review/deploy the changes - Once this has completed you can continue to raise a PR/merge your config changes as usual
How to remove resources from the TF state
- Select the
removeoperation - Enter your application name e.g.
apex - Select the relevant environment workspace e.g.
development - Enter
resource addressesas required (these must be comma separated when handling multiple resources)
- e.g. to remove an s3 bucket/ec2 instance
aws_s3_bucket.test_import_bucket,aws_instance.test_import_instance
- Select
Run Workflow, and follow the same steps as above to review/deploy the changes
Troubleshooting
If any errors are encountered you can review the logs for more detailed information. If in doubt contact the Modernisation Platform team via the ask channel